Wednesday, August 14, 2013

So long, farewell, until we meet again...

 Today I said goodbye to two of my beautiful alpacas.  Sue Ellen doesn't look too beautiful here with all of the dust on her back, but trust me!  She is beautiful!  Sue Ellen (nicknamed "baby") was a favorite for her fleece, but even more so for her personality.  Sue Ellen loves kisses!  She likes to hum along every time you come out to greet her, too.  I believe she thinks she is a dog... man's best friend.  Oh how I will miss her!
 
 Okay, right about now you are probably thinking that my alpacas died.  Nope.  They didn't.  A wonderful couple purchased them to join their herd of animals.  They have all kinds of animals and had only a few alpacas.  So, via a friend of a friend, they heard I was selling some of my animals.  They are a wonderful couple and have promised me I couldn't find a better home for my beloved animals.  Here is Nisha, standing alongside Sue Ellen.  Nisha is sweet from heat to toe!  She's often seen "smiling" in pictures.  And her fleece, well get a load of that color!  I'm going to miss knitting with that color!  I'm going to miss her pretty face, too.  Farewell my friends!  Thank you for the fleece you've provided me over the years and for your sweet personalities!  I'll miss you, but am so happy you've found a new place to gain friends.

 
Okay, so before I start to cry again, I'll move on to the next topic of interest for us here at the ranch.  We've hooked up with All Season Greens to get a "trial run" of their hydroponic greens.  These greens take six to seven days to grow in this trailer before they are a lush, green carpet of "grass".  This trailer is climate controlled, has variable lighting, and a mister system that periodically keeps the seeds moist for the near-perfect, growing situation.  Every night, I take three scoops of barley seed and soak them in a bucket overnight.  In the morning, after scrubbing down a tray, I spread those seeds into a plastic tray that is then set on a shelf in the trailer. 
On the back side of the trailer, in about six or seven days, I will be able to pull out 50 lbs of food for my animals.  When the system is at full capacity, it can produce almost 100 lbs of food.  Mind you, this seed can be organic, non GMO seed, and no artificial junk or pesticides added to it.  I'm super excited!  This will replace our current feed that we purchase at the feed store.  It also should cut our hay bill in half!  Oh yeah!  That's what I'm talking about!  We feed approximately 50 lbs of feed per day, so I've already talked to a couple of people about the possibility of purchasing the remaining 50lbs per day, if we choose to purchase this system and do this ongoing.  It is an expensive start up, but we have laid out the numbers and figured with the cost savings and selling the 50 lbs per day, we can have this baby paid off in 4-5 years.  Plus, it gives us the option of feeding our animals absolutely fresh, organic, non GMO feed!  That makes me feel good!
 Here is the tray after a couple of days.  I'll have to post later in the week when we've reached the final stage and are ready to feed it to our animals.  All Season Greens has been dropping off little "pallets" of grass for a few months now and my horse and alpacas LOVE IT!  The chickens will eat anything, so that wasn't too much of a surprise, but the alpacas!?!  Awesome!  We are still trying to coax our cow into eating the stuff.  She likes the top of the grass, but it's the sprouted seed that is the most beneficial part.  It holds the majority of the nutrients.  If we decide to do this ongoing, we'll need to do a histogram on our animals fleece to see if there is a difference.  Also, we've heard you can actually TASTE the difference in the chicken's eggs after they've been eating this.  Time will tell.  I'm excited!  I've been wanting to do this for some time now.  I've been watching other farms do this in climate controlled rooms on their barns.  We figured that would be just too expensive to build onto our existing barn.  So, this is a nice alternative.  I'll keep you posted on the results!

Happy Hump (Wednes) Day!

A little summer retreat with friends!

  What could be better than getting away with some of your best friends for the weekend?  Getting away for a weekend with your best friends and another 30 or so women of which you also enjoy the company of!


I had the pleasure of attending a weekend retreat with nine of my friends.  We went to the Wildflower Knitting Camp, located this year in Larue, Texas.  I'll bet most of you don't even know where that is!  It is situated about an hour east of Canton, Texas.  Now, I'll bet you know where that is, don't you?  Third Monday Trade Days!  While we didn't get to partake in the Trade Days, we did get to have all kinds of fun at camp!  Here is a picture of Anna, enjoying her beautifully knit scarf, along with a hand dyed, silk scarf that she made. 
 
 
Elaine made the same scarf in a gorgeous, teal color and then dyed her scarf with various greens and browns, with a hint of the teal blue.  Elaine also finished weaving a tri-loom weaving project that she's been working on AND managed to shop for some great new patterns to ooh and ahh over for the next few months.  Which one will she begin?  Only time will tell!

 
Marie worked on a 7 foot tri-loom project all weekend.  She made some serious headway!  Marie brought her granddaughter to knitting camp again this year.  What an exciting way to share time with your grandkids!
 
Cindy Lee (as we so affectionately call her) was crocheting like a crazy woman!  She's been working on shrugs for her three granddaughters and her daughter.  She's using a beautiful variegated yarn that really has been turning out nice.  She designed this pattern on the fly and we love it!  I think this may be a future project for the group.  Just sayin'....
 
Oops!  I didn't check my camera when I took this picture of Roxana.  She's gonna love me for posting this picture of her with her eyes closed!  I think she had only had about four drinks at this point, too!  Just kidding!  See the scarf that Roxana is wearing?  Josephine, shown here on the right (fun fact:  Josephine is from Scotland... ask her to speak for you.  Her accent is really cool), showed us a way to make this ruffle scarf that is WAY EASIER than we way we've previously been making them.  Seriously, a five year old could make them!  If you can pull a loop over another loop, you can make this scarf!  Who would have known?  Josephine did!  She's got her "model" pose going here for us.  Thanks, Josephine!


And here's a picture of Zigzag rider, aka Joyce.  She got an unexpected hug from Barney today after he had been helping her with her tri-loom project.  Joyce had her hand in just about every project.  She knitted, beaded, made amulets (did I spell that right?), did some weaving... that girl was everywhere!  I didn't even get to say goodbye to her because she zoomed out the door so fast, I didn't even know she was leaving!  You've gotta be on your toes with this girl!  Plus, she's a lot of fun to be around at the "evening party".  But that is for another story on another day....  :o)
 
Here is a picture of all of our beautiful models.  You see, there are a lot of young ladies who are working on their crochet, weave, and knit skills, too at this camp.  Before we leave, they give us a fashion show of all the projects that were made.  Yeah, there are some bragging rights going on here!


Check out this bag!  Isn't it darling?  I want one!
 

 Remember in a previous post I told you how I like white yarn?  Well, get a load of this!  Man!  Isn't that beautiful!?!  I believe this set was made by one of the retreat staff members.  Gorgeous!


 Again, here is another example of some serious creativity.  This is the Wildflower Retreat mascot that was also made by one of the ladies putting on the retreat (I can't remember which one).  This bear was made from an old wool sweater.  Talk about recycling!  Isn't this adorable!?!  Heck, I'd love to sleep with one of these!


Again with the creativity!  This is a backpack that looks like a cat.  The handle is made out of the tail.  Too cute!


Stop the bus right here!  Get a load of this bag!!!  Okay, I took this picture at the spring retreat, but it showed up again at this retreat.  I flipped over this bag!  Dorie actually needle felted this by hand!  Can you believe that!?!  Talent just oozes out of every pore of her body!  Disgusting!  (Just kidding...jealous... stop that!)

Well, that was our weekend.  We had a ton of fun!  I laughed so hard I cried.  Elaine said it had been a long time since she saw someone enjoy themselves so much they cried.  Hang around us a little more, Elaine.  It's become common place for us! 

When was the last time you laughed so hard that you cried?  Well, that's been too long!

Early Christmas with alpaca yarn!

 
Oh happy day!  Spinderella returned my alpaca's fleece that was sent late last year.  They are super, SUPER busy, so I was thrilled to get this back.
 

Isn't this beautiful?  This alpaca yarn is wrapped around a 4 ply cotton core which makes it extra sturdy!  Sells for $1 per yard.  I've gotta get weaving this baby up into a rug! 


Another yummy rug yarn with some blue "twist".  Yep!  I'm gonna love working with these new rug yarns!
 

The possibilities are endless!


And get a load of this beautiful and soft grey alpaca yarn.  Oh yeah!  That's what I'm talking 'bout!


It seriously is just like Christmas when you get a box full of this stuff!  This fawn might even get a little dip in a dye bath.  What about a forest green or a dark, midnight blue?  Oh yeah!  Of course, I'll leave some in the original, natural fawn, too!


Oh!  I must admit!  I am really partial to the white yarn, too.  I love the clean, crisp look of a white hat, scarf or shawl and mittens.  It looks so rich and beautiful. 
 
 
What would you make with each of these?  I'm heading to the pattern book right now to figure out what each one wants to be made into!  Excitement is building!!!!


April? It's August already!

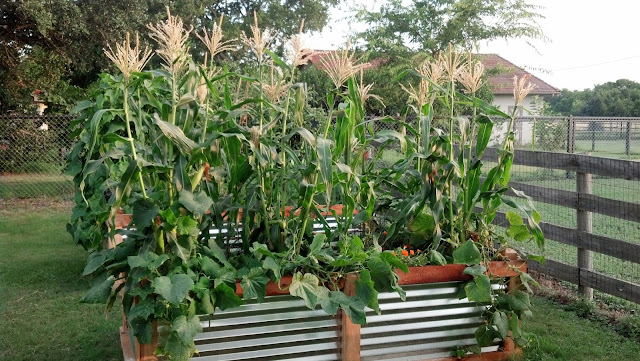
Wow!  I cannot believe the last time I posted was in April!  Wowza!  Isn't it amazing how busy we can become?  I thought the summers were for catching up on things, didn't you?  Well, where do I begin?  How about that garden box that we built in the last blog, back in April?  Well, here it is!


As you can see, we have been receiving a bountiful amount of produce. 


The corn has been fantastic!  I read an article that states corn is best when eaten less than 12 hours after being picked.  We tasted the difference!  Incredible!  Corn is one of the easiest things to grow, too.  My sugar snap peas didn't fair so well, though.  I'll try something different with them next year.


In this picture, you can see the cucumber and tomato plants in the back.  We've had lots and lots of cucumbers this year.  The bell pepper and jalapeno pepper plants are being crowded out and haven't produced much.  I'll need to space them out better next year... like in a different raised bed!  The asparagus plants are doing quite well in the front.

We had terrible issues with the grasshoppers this year, too.  I went to Wells Bros and picked up some organic powder to put on the leaves.  It worked like a charm!  Love it!  Now if I could keep the field mice away.  Argh!

How well did your garden do this year?  What would you do differently?

Wednesday, April 24, 2013

Have you started your garden yet? Here's my new raised bed garden!

I've been "poking around" on Pinterest, looking for ideas on gardening, when I ran across a picture of this raised bed garden.  I fell in love and really wanted one.  So, I put the pencil to the paper to see how much one of these little babies would cost me.  Each of the raised beds came to about $78.  Pretty pricey, but I've just about had it with my cast iron tubs out in the backyard.  After our drought a couple of years back, I had determined I would find something with an open bottom. 
Well, here it is!
 
 We began with a trip to the local Lowe's store.  We opted to go with cedar on the wood, rather than treated.  After all, who wants to grow their own vegetables in a pressure treated wood garden?  Ew!  I don't want that leaching out on my veggies!

We took one 2x2x8 post and cut it into four equal posts and notched the tops, for aesthetic purposes.


Here is Tim cutting the posts into four separate pieces.  He also used this to cut the tops off of each of the posts.

 Here is a picture of the completed top on one of the posts.  You get the idea.


Next, Tim cut the corners of the cedar planks so they would fit with 90 degree angles.


 There are four boards for the top of the box and another four boards for the bottom of the box.

 Okay, I will tell you we tried this two ways.  The first time, Tim simply put the base together with the posts.  Then, he added the panels.  Finally, he had to add the top boards.  This was quite difficult trying to get everything square.  The panels keep wanting to shift and move.  Not fun.  So, on the second box, we did it differently.


This time, Tim decided it would be much easier to build the box and then simply cut out the corners on the panels before adding it to the box.  Yep!  That was much easier!


Tim measured out the four panels first and cut them to size (the two sides and two end pieces).

Next, he simply cut out the pieces and the corners, to fit around the posts.


Here, you can see how the panels are simply cut around the posts. 
 
Next, enlist the assistance of your children!  Here, Harrison staples the panels to the end posts.  He is a pretty good stapler!
 
Make sure and staple both the ends and all of the inside sections to make sure the panels stay in place.
 

Hailey came along and hammered in the staples that didn't go in all the way.  As you can see here, we added some trim to the end corners, too. 

Now for the trim on the sides. Tim placed a piece underneath and then added a trim piece on top.  Here is a picture of the underneath piece.

Here, Tim is adding the outside trim piece.  This gives added stability for when the box is filled with all of the fresh compost!

There you go!  Our completed, raised bed, garden box!

Here it is after we carried it to it's final destination in the backyard!  Isn't that nice looking? 

 After getting the box in place, we needed to make two compost tubes, per box.  This is easily done with chicken wire, hog wire, or "whatever" wire. 

 Here is a finished compost tube. 

 We placed two tubes in the center, on each end of each garden box and initially, filled with newspaper, to aid in keeping the compost from going in the tubes.

 
 Yes, we are lucky!  We have a tractor with a front end loader AND we have fresh compost, since we have alpacas, chickens, cows, and horses.  A menagerie of poo!  This compost has been sitting for a year, so it is ready to go into the boxes.

 Here is an idea I got off of Pinterest.  We had some tubes out in our barn from a prior project.  We took the tubes and drilled holes on one side all the way down the length of the tube for slow drainage.

 These tubes are then placed in a "U" shape inside the box, with the ends sticking up for filling with water.  The holes are facing down.  We placed these approximately 6 inches below the top fill of compost.

 Here are some completed pictures of the completed garden box.  You can see the tubes on the left side, sitting up out of the box.  I fill these up with water and walk away.  The tubes slowly release the water via the small holes in the bottom into the soil sitting 6" underneath the surface.

Here is a picture of the second box.  Again, the compost tubes are in the center.  I add vegetable and fruit scraps to it, as well as fresh cut grass after we mow, and whatever else I can find to compost.  This releases the nutrients into the bottom of the soil.  The black tubes are, again, for watering.  I'm trying this out this year.  If it works, awesome! If not, they are only 6" underneath the surface and can be easily dug up for next year.
 
That's it!  I hope you get some good ideas from this!  Have fun!